Okay, let's talk about Free Fire. Specifically, let's zero in on Bermuda, that classic map that just keeps on giving. Now, you might be thinking, "Another article about landing spots?" I get it. But hear me out. This isn't just a list. This is about understanding why certain spots work and how to make them sing for you. Because let’s face it, half the battle in Free Fire is won before you even pull the trigger.
I remember one game, landing at Peak thinking I was hot stuff. Huge mistake. Got swarmed by a squad who'd clearly read the same "best landing spots" list as me. Lesson learned: knowing is half the battle, but adapting is the other (more important) half. And that's what we're diving into. Think of this as less of a rigid guide and more of a conversation over coffee about strategy. Sound good?
The Obvious (But Still Good) Free Fire Bermuda Drop Zones
Let’s start with the places everyone knows. These are popular for a reason, right? Like that one time I tried to build a base in Fortnite using only impulse grenades... these spots are kinda like that: a gamble, but with high potential payoff.
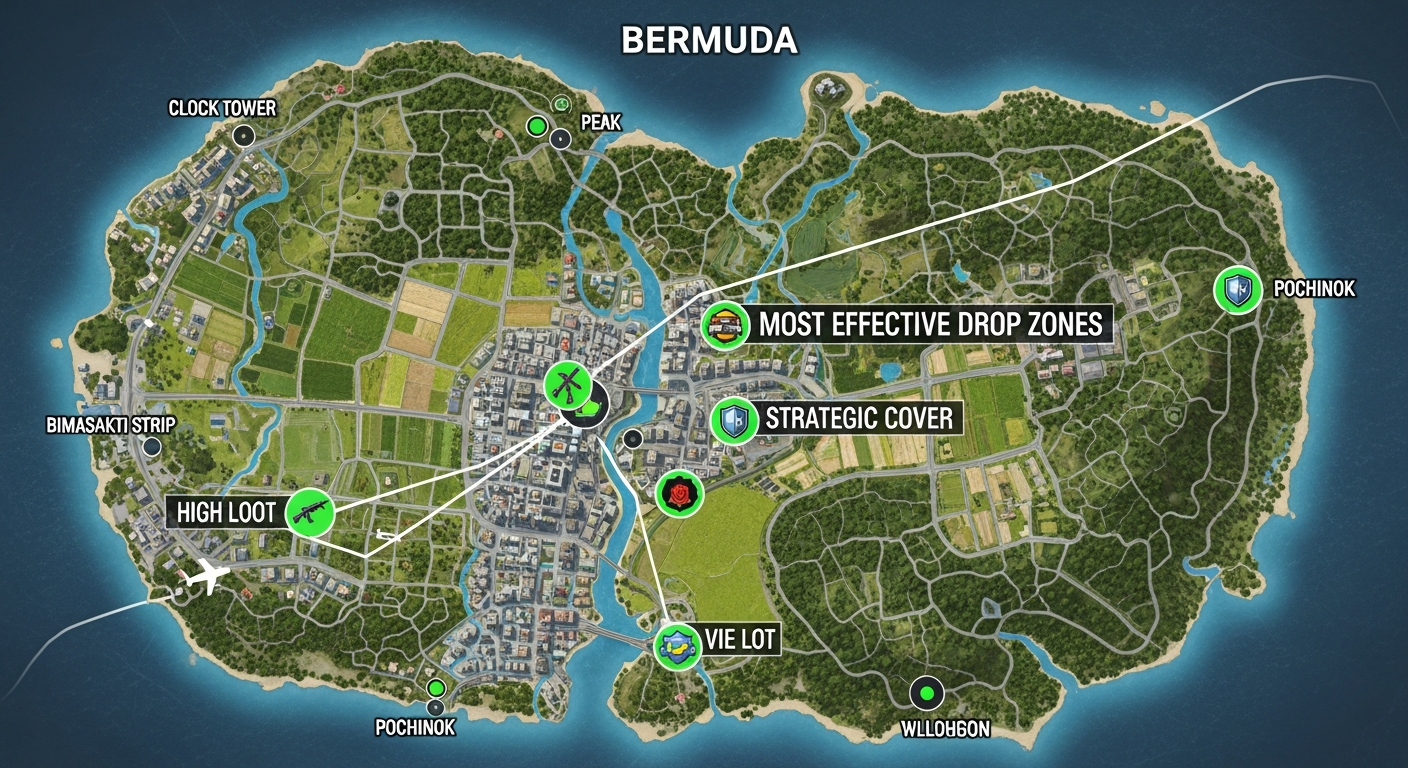
- Peak: The classic. Central location, plenty of loot. But be warned: it's a kill zone. If you're confident in your close-quarters combat, go for it. Otherwise? Maybe admire it from afar.
- Mill: Another loot-heavy area, often contested. The warehouse and surrounding buildings offer plenty of cover, but also plenty of ambush points. Approach with caution (and a good headset).
- Bimasakti Strip: This area tends to be overlooked, but it shouldn’t be. The houses and surrounding areas offer a decent amount of loot and great vantage points. But don’t get too comfortable, because it gets chaotic really fast.
Actually, that's not quite right. "Good" is subjective. These are high-risk, high-reward. You need to be aggressive and quick. If you're a more tactical player (like me, most days), these spots might be a nightmare. Which leads us to...
Underrated Gems: Free Fire Bermuda Map Spots to Explore
These are the spots where you can breathe a little easier, gear up without constant gunfire, and strategically position yourself for the mid-game. The places that separate the survivors from the immediately deceased. I've got to admit, this part fascinates me. Everyone flocks to the same few spots, leaving these untouched havens. Perfect for the sneaky player.
- Sentosa: Far from the center, yes, but often ignored. Decent loot, and you can usually rotate into more populated areas with a decent advantage. Plus, who doesn't love a good beach vacation... with guns?
- Cape Town: Similar to Sentosa, but with a slightly different layout. Good for players who like to control the coastline. Keep an eye on those bridges, though; they're chokepoints.
- Graveyard: Often overlooked because it's on the edge of the map. However, this area offers a good amount of loot and a sneaky route to the center of the map.
The frustrating thing about this topic is that the best landing spot truly depends on your play style. If you're all about aggressive plays, go for Peak or Mill. But if you prefer a more strategic approach, Sentosa or Cape Town might be better choices. Think about it this way: your landing spot is your opening move in a chess game. Choose wisely. Picking the right weapon is the next.
Mastering the Rotation
Okay, so you've landed, you've looted. Now what? Rotation is key. Don't just stay put and wait for the circle to close. Anticipate where other players might be heading and position yourself accordingly. Use vehicles, ziplines, and even swimming to your advantage. The goal is to control key areas and choke points before anyone else does.
And remember what I said earlier about adapting? That applies here too. The circle is unpredictable. Be prepared to change your plans on the fly. That ridge you thought was a perfect vantage point? It might suddenly be in the middle of nowhere. Keep moving, keep scanning, and keep thinking.
FAQ: Free Fire Bermuda Drop Zones
How do I know if a landing spot is too crowded?
Listen closely as you parachute down! If you hear a ton of other parachutes deploying nearby, brace yourself for a fight. Keep an eye out for the number of buildings in an area, if there are many buildings in that area, then it will mean the area will have a lot of loot which can attract many players to land there.
What's the best way to learn a new landing spot?
Practice! Drop into the same spot repeatedly in classic mode to learn the layout, loot locations, and potential enemy ambush points. Experiment with different routes and strategies.
Why are some landing spots considered "hot drops"?
Hot drops are areas with a high concentration of valuable loot, which naturally attracts more players seeking to gear up quickly. This leads to intense early-game combat, making them risky but potentially rewarding.
Is it always better to land in a high-loot area?
Not necessarily! It depends on your play style and skill level. If you're confident in your ability to win early fights, a high-loot area can give you a significant advantage. However, if you prefer a more cautious approach, landing in a less contested area with decent loot can be a safer bet.
Free Fire, like any battle royale, is a game of constant learning and adaptation. What works one day might not work the next. But by understanding the map, knowing your strengths, and being willing to experiment, you can consistently improve your game and climb those ranks. Now get out there and claim your chicken dinner!

