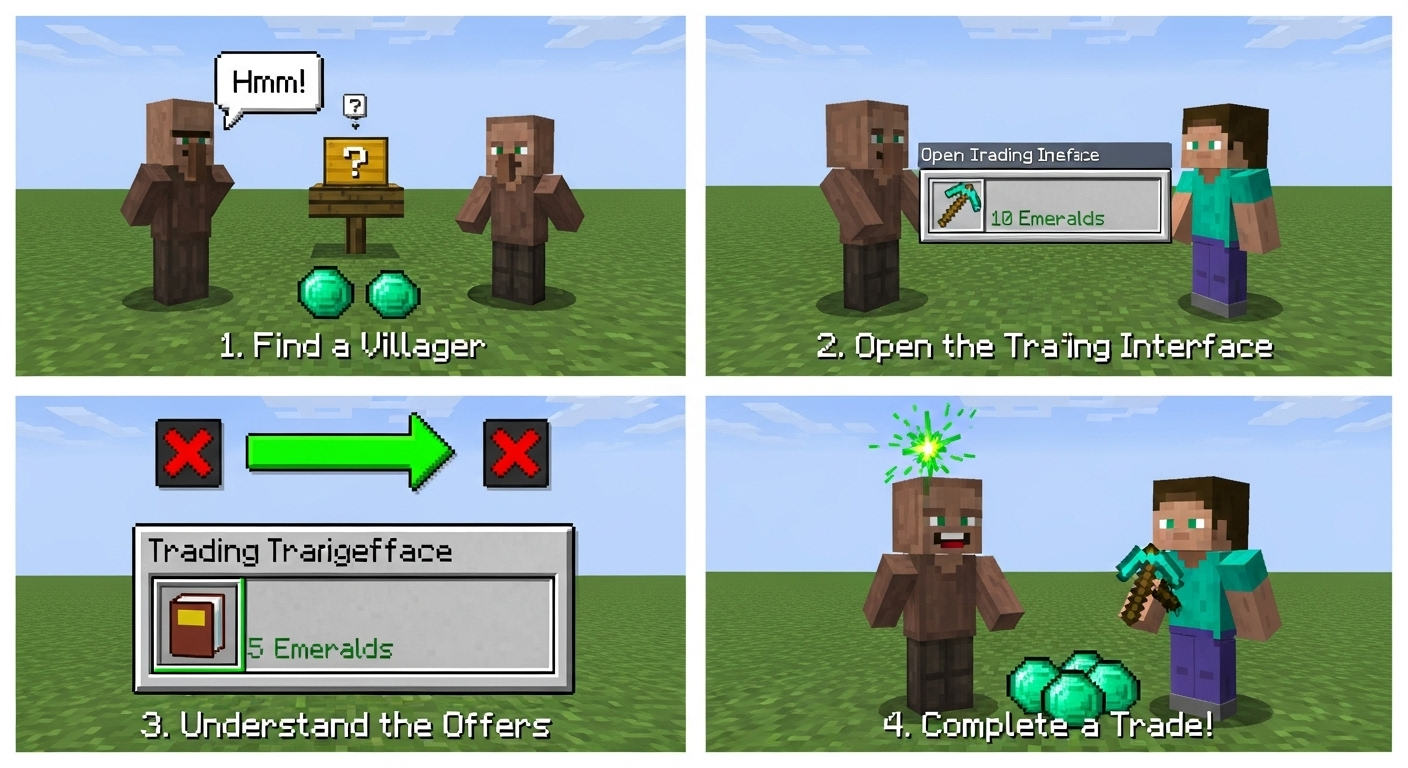
Okay, let's talk Minecraft. Specifically, let's dive headfirst into the chaotic, sometimes frustrating, but ultimately rewarding world of villager trading. I remember when I first started playing, villagers were just… there. Cute little noises, funny walks, and a whole lot of doors. I never quite understood what they were for. Oh, how wrong I was.
Now, years later, my Minecraft worlds are practically powered by the finely-tuned economic engine of villager trading. We're talking enchanted diamond gear for the price of some paper. It's practically stealing! But how do you get there? That's what we're going to cover in this guide – the absolute beginner's roadmap to mastering villager trading. And trust me, once you get the hang of it, you'll never look at a wandering trader the same way again.
Setting Up Your Trading Post
First things first, you need a place to actually do the trading. You can't just expect villagers to wander around aimlessly and spontaneously offer you deals. Although, that would be kind of amazing. What you're aiming for is a well-organized, easily accessible trading hall. This can be as simple or as elaborate as you like. Some people build sprawling complexes with individual cells for each villager. Others (like me, initially) just cram them all into a small room. The key is functionality.
What do I mean by that? Well, you need to be able to easily access each villager to see their trades. You also need to be able to protect them from zombies. Because nothing ruins a good trading session like a zombie invasion turning all your precious villagers into… well, zombie villagers. Which, actually, can be cured, but that's a whole other can of worms. Let's stick to prevention for now. Walls, doors, and plenty of light are your friends.
And, actually, that's not quite right – it's not just walls, doors, and light. Think about access. You want to be able to quickly move around and interact with villagers, replenishing their trades, and shuffling them around if needed. More on that later. For now, prioritize accessibility and safety. I've got to admit, this part fascinates me.
The Villager Job Market (Professions Explained)
Alright, so you've got your trading hall. Now you need the villagers, and more importantly, you need to assign them professions. This is where things get interesting, because a villager without a job is like… well, it's like me without coffee. Utterly useless. Each profession unlocks a different set of trades, and some professions are way more valuable than others. Librarians, for example, are the holy grail. They offer enchanted books, which are essential for maxing out your gear. Farmers, on the other hand, mostly trade for food. Useful, but not exactly game-breaking.
To assign a villager a profession, you need to place the corresponding workstation near them. A composter turns a villager into a farmer. A lectern turns them into a librarian. A grindstone? A weaponsmith. You get the idea. The frustrating thing about this topic is that villagers aren't always cooperative. Sometimes, they refuse to link to a workstation, or they link to the wrong one. There are ways to manipulate this, but it can be tedious. Patience, young Padawan. Patience. Or try to use bells, they are great for attracting villagers and they will walk closer to their workstations.
And remember, a villager can only have one profession at a time. Once they've linked to a workstation, they're locked in. Unless… you break the workstation. This resets their profession, allowing you to try for a different one. This is how you roll the dice for those sweet, sweet librarian trades. Also, here’s a fun fact: zombie villagers can be converted back to regular villagers using a golden apple and a splash potion of weakness! Think about it that way, you can get more villagers.
Trading Mechanics: Getting the Best Deals
So, you've got your villagers, they've got their jobs, now it's time to actually trade. The basic mechanic is simple: you offer the villager what they want, and they give you what you want in return. Emeralds are the primary currency, but villagers also trade for things like wheat, paper, and various tools and weapons. But here's the thing: the prices aren't always fixed. They can fluctuate based on a number of factors.
One factor is supply and demand. If you buy too much of one item from a villager, the price will go up. Conversely, if you sell them too much of something, the price will go down. This is why it's important to diversify your trading. Don't just buy all the enchanted books from one librarian. Spread the love around. Another factor is zombie attacks. If a villager is attacked by a zombie but survives (thanks to your heroic efforts, of course), they'll offer you discounted prices as a thank you. It's like a zombie attack discount! Although, maybe don't intentionally let zombies attack your villagers. That's just bad karma.
Think about it this way: the more a villager trusts you, the better the deals. It’s really like real life, but in block format. I initially thought the trading mechanics were random, but after looking deeper, it's a surprisingly nuanced system. Remember that the first trade is the most important one, as it will level up your villager and open up a new, more interesting one.
One more thing: curing a zombie villager (as mentioned before) gives you the best discounts available. Also, once you trade with a villager, the trade is locked in. Unless you're on Bedrock edition, where you can change the trades by placing and breaking the workstation.
Advanced Techniques: Curing and Breeding
Want to really min-max your villager trading operation? Then you need to master curing and breeding. Curing zombie villagers, as we touched on earlier, gives you permanent discounts. It's a bit of a hassle, requiring a splash potion of weakness and a golden apple, but the rewards are well worth it. Imagine getting those enchanted books for practically free! I keep coming back to this point because it's crucial. The price difference is significant.
Breeding villagers is also essential for expanding your workforce. Villagers will only breed if they're willing, and they only become willing if they have enough food. Throw them some bread, carrots, or potatoes, and they'll get to work. You also need to ensure they have enough beds. Three villagers means three beds. Simple math. The tricky part is containing the baby villagers. They have a tendency to wander off. But hey, that’s part of the fun, right?
But, you might be wondering, why breed villagers when you can just find them in villages? Well, for starters, villages aren't always conveniently located. And secondly, breeding allows you to control the professions of the villagers you get. You can selectively breed for librarians, or farmers, or whatever you need. It's all about optimizing your operation. You are going to need quite a lot of villagers for a good trading hall.
FAQ: Your Villager Trading Questions Answered
How do I know if a villager is ready to trade?
A villager is ready to trade if they have a profession and a full trade list available. You can tell if they have a profession by the clothes they're wearing. A white coat means they're a cleric, brown means they're a farmer, and so on. If they have a profession but their trade list is empty, it means they need to replenish their stock. This happens periodically, so just check back later. And of course, always check their prices before buying!
Why are my villager trades so expensive?
Several factors can influence villager prices. Trading with them too much of the same item increases the price, while being attacked by zombies (and surviving) decreases it. Curing a zombie villager gives you the best discounts. Also, different villager types have different base prices for the same items. Librarians, for example, tend to charge more for enchanted books than other villagers.
How can I protect my villagers from zombies?
Protecting your villagers is crucial for maintaining a stable trading operation. The best way to do this is to build a well-lit, enclosed trading hall. Zombies can't spawn in well-lit areas, so torches and lanterns are your friends. Also, make sure the walls are tall enough to prevent zombies from jumping over them. Iron doors are more zombie-proof than wooden doors. Finally, consider building a moat around your trading hall. It's a bit of extra work, but it can be very effective.
What's the best way to get villagers to my trading hall?
Moving villagers can be tricky. Minecarts are the most reliable method. Simply place a minecart near the villager, and they'll usually hop in. Then, you can push the minecart along a track to your trading hall. Boats also work, but they're less reliable on land. You can also use leads to drag villagers, but this is very slow and tedious. The best method, honestly, is to build a temporary rail line directly to your trading hall.
So, there you have it: a beginner's guide to Minecraft villager trading. It's a complex system, but once you get the hang of it, it can be incredibly rewarding. Just remember to be patient, experiment, and don't be afraid to get your hands dirty. Happy trading!

